This is the coffee table last week. It was purchased about twenty years ago from an ad on Craigslist. I'm sure I didn't pay more than $50 for it. It was exactly what we needed at the time, and it was then in pristine condition. It has suffered a lot of wear since it came to our house.
When we were ready to begin, Carey removed all the drawers and lifted the wooden part of the table off of it's metal base, and he took it to the workshop. He then removed the drawer hardware and sanded all surfaces. You may recall, from a previous post, that we tried three different stain colors on it, but it didn't take any of them well, so we chose a paint color that appeared to be a base tone of the new furniture in the room, and Carey painted all of the table's exterior surfaces.
I then mixed a little of the base color with a little of the darkest stain (they were both latex) and added a little water to thin it out. (Instructions said not to thin with water, but I had very little to lose, and so far it seems to have worked acceptably.)
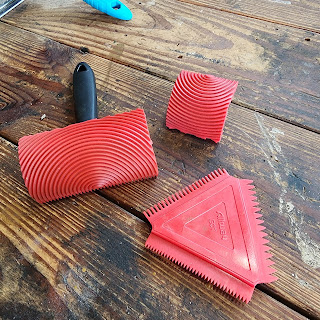
The three tools above are what are used to apply a faux wood grain. I tested using them on a piece of scrap wood that had been painted the base color. You use a pulling and rocking motion with the handled semi-round tool. When I felt comfortable using them on the scrap wood, I began on the actual table.
With the paint/stain mix, I painted each side of the table, one at a time, and used the tools to add the 'wood' texture. Then I did the same to the drawer fronts. Once I had gained some confidence on the smaller areas of sides and drawers, I painted and fauxed a strip running the length of the table. I then painted a strip next to the first and repeated the process until the top was finished. The picture above was taken after I completed all table surfaces. I have no idea why the side at the bottom right corner of the photo looks so much lighter than the top; it must have had to do with the lighting in the workshop. Carey was happy with it the way it was at this point, but I didn't like the distinct light and dark of the two colors. We left it overnight to dry thoroughly.

In the morning I used a cloth to rub the surfaces, a section at a time, with the dark stain in the direction of the 'grain' then used a clean cloth to remove the extra stain until the light color was toned down somewhat.
In case you can't see the differences, here's a close up before and after this step. The arrows point to the same spot (a faux knot if you will) before and after applying the stain to blend the colors a little. It's subtle, but I think it definitely makes a difference, but maybe it's an IRL thing.
These are the drawers, and again, the lighting in the workshop makes them look different than the table top, but they are very close in reality.
After letting everything dry overnight, we added a coat of polyurethane, and let it dry overnight again before bringing it in and putting it all back together.
Here is the before:
And here is the after:
Here is a different angle closer up, so you can see more of how the faux grain turned out:
We'll leave it for awhile to cure before setting anything on it.
I'm pretty happy with how it turned out. It's not perfect, but it blends much better in the room now, and it still holds all my memories of the kiddoes visits when they were little. (Background story linked here if you missed it.)


Beautiful job!
ReplyDeleteThanks, Pamela.
Delete