background

Showing posts with label Practical Arts. Show all posts

Tuesday, January 23, 2024

Mom is relegated to furniture...

It is absolutely ridiculous when I make myself sit still so that Rudy can have a good nap!

I think it may be time for me to make one of these...
I don't know who to give credit to for this idea, but whoever they are, they are brilliant!  Of course, everybody in my family has short legs, so ours may not be comfortable for a larger dog, but it might be worth a trip to goodwill for a used pair donated by a taller person.  :)

If I have any success, I'll let you know.


Saturday, February 12, 2022

The Fixer...

When I was a kid, and anything needed untangling, my mother always recruited me.  She had poor eyesight, and she and my dad were both over forty when I was born, so my young eyes were a distinct advantage. Necklace chains.  Knitting yarn.  Fishing line.  Once we were visiting a cousin of hers when I was a young teen.  My mother noticed a puka shell plant hanger lying on a side table and asked about it.  Her cousin, embarrassed, admitted it was completely tangled, and should have been thrown away long before.  My mother told her I would untangle it.  The pressure was on.  It was quite the chore, but before we left a couple of hours later it was a usable plant hanger once again.  Ugly, but usable.  :)

There were other things I fixed (repaired) as well.  Broken ceramics. Picture frames.  My parents lived through the Great Depression, so everything was repaired if at all possible.  It was a challenge to figure out the best way to do things, and I enjoyed it.

So here's my latest fix.  Remember this?

 I was so disappointed that there were three missing pieces.  So ever since the last piece went in, I've been contemplating how I could camouflage the empty spots.  Today I decided to tackle it and make our dining room table usable once again.

I gathered some supplies.  
  • Top left:  Some tagboard, scissors, exacto knife, and glue.  
  • Bottom left: I took a sheet of paper and slid it under the puzzle and traced the empty spots.  
  • Top right: I carefully removed a 6- to 8-piece section near each of the empty spot that seemed to have similar colors/patterns.  (I used Post-It tape on the back of these sections to hold them together during the process.  It was safely and easily removed when I was ready to reinsert them into the puzzle.)
  • Bottom right: I made color copies of the puzzle sections.

I cut the missing pieces out of tagboard (twice each as it took two layers of tagboard to equal the thickness of the puzzle pieces).  I fitted these new pieces into the empty spaces by shaving off edges where needed.  I traced these onto the color copies, cut out, and glued together to complete the new pieces.

Et voila!

My plan is to apply Mod-Podge to the front and back of the puzzle, and frame it to bring out anually with the autumn decorations.  The tagboard is not acid free, so those pieces may discolor over time, but I don't foresee it being considered an heirloom, so I can live with the risk.  :)

Thursday, November 11, 2021

What I did on my autumn vacation...

Hope everyone is well and has yet to give up on my sporadic blogging.  Thanks for the reminder to get back to it, Barbara!  :) 

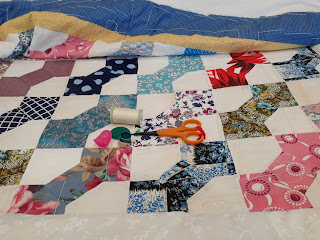
I've been on vacation this week, and spent 4 days at quilt retreat with my library quilting group.  I worked on this much-delayed work in progress.  The bow tie quilt top was pieced by the grandmother of my longest-term friend...not to be confused with my oldest friend.  ;)  She handed it to me 21 years ago and asked me to finish it.  Twenty-one years!  I am so ashamed that I didn't finish it and return it to my friend decades ago!

I've always loved bow-tie quilts, and wanted to quilt this one by hand rather than have it machine quilted which was part of what led to the delay.  I tried to give it back to her at one point, but she wouldn't take it.  We've been friends since the 5th grade, so since I've always been a procrastinator she had reason to know this was a possibility.  

I started the hand quilting of it on the first day of the retreat in a wooden hoop, but that was pretty horrible.  On the second day I phoned Carey and asked him very nicely if he would meet me half way and  bring my PVC standing quilt frame.  The retreat was over 2 hours from our home, so the rest of the group was mightily impressed when he said he would.  Such a sweetie!  When assembled this frame is about the size of a card table, so gave me much more work area and much less frustration.

I made good progress on it, but still have a long ways to go.  I'll keep you updated.

The Giver of Stars by Jojo Moyes

I came home Tuesday and started (and finished) a book that a friend recommended at retreat: The Giver of Stars by Jojo Moyes.  Hard to put down.  About the Pack Horse Library Project which was a WPA project started in the 1930s.  The ebook was available through my library.

This morning I remembered to log on to work system and complete our insurance selections before the open enrollment period ends tomorrow.  Carey will be retiring at the end of the year (though he only has to work for another week and a half in actual days on the job), so have to make sure we both have coverage starting January 1.

Tomorrow I have a doctor appointment, and then hope to go get my Covid booster on the way home.

Not sure yet what the weekend will bring other than the normal work-week laundry.  Hopefully it will also bring some more hand quilting...don't want that to get pushed aside as I would really like to complete it before the end of the year.

Saturday, February 6, 2021

Saturday snail mail catch up...

The photos of cards have been stacking up...

I love this flower set, but does the center (which I also used for the background) remind you of anything?  Maybe it's just me.

Here's one that uses a different fold and the Darling Donkeys stamp set.  I CASEd this one from Kelly Acheson.

This one, as well as the next six, use the December 2020 Paper Pumpkin.  The card bases that came in the kit were so gorgeous, but they looked way too sophisticated to go with these cartoon-like images to me.  So I made all of these using orphaned papers and scraps I had lying around for more kid-like designs.  


We needed some sympathy cards to have on hand at work, so I came up with this one last night.  It's a larger card, being about 5" x 7".  Though I like how it came out, it is a single layer card.  I think I will do the stamped design on a separate sheet and cut it out, then pop it up.  Still simple, but a bit more 'special sauce'.  :)


This one is from an old Paper Pumpkin...last year?...the year before?  It is the first Valentine I've made this year.  I love how it turned out.  I'll probably make a few other designs as well.

Now I'm off to start weekend chores.  If I get everything on my to-do list done, I can stamp some more!  :)


Saturday, July 11, 2020

Saturday snail mail...

This is just a little 'busy'.  Ah, well.  I needed to make something really quick while Caitlyn was here for her to write a note to her great-grandmother.  I think I would be happier with it if I had just used a solid-color ribbon for the bow, but this gingham bow was lying on my work desk already tied, so I popped it on.

I stamped this background floral stamp (from Simon Says Stamp) in black Memento ink.  I used Stampin' Up! Blends to color in the one flower at the bottom.  I used an Exacto knife to cut around the petals so that I could slide the pink center layer behind it.  

Same basic stamping and coloring on this one, but I used an embossing folder with a similar all-over floral pattern to emboss a rectangle, then trimmed out the center to make a frame.  Popped up the pink embossed frame on the card front, added a few of the palest pink sequins, et voilá!  I love this one.

A 21st birthday card for Bobby.  He loves black & white clean graphics.  I also used some gray design papers, punched different-sized circles, and glued them on randomly.  I 'splattered' it w/ Wink of Stella before layering on a gray card base, then added a red heart with 'happy birthday' stamped on it.

I stuck with circles for making a stamped background design.  To start I punched different-sized circles from cardstock squares leaving as much border as possible.  I used these as stencils, and with a blending brush added random circles all over a 8.5" x 11" piece of cream card stock in gray, green, and brown.  Then I stamped on smaller brown circles with a little rougher 'texture' and stamped the swirly circles in dark brown.  When I was happy with the all-over design, I cut strips, wrapped with cord secured with a knot, added some copper metallic edges, and used adhesive foam to pop it up onto a layer of cream-colored watercolor paper on a cream card base.

On this one I stamped over a few of the small light brown circles with Delicata Celestial Copper (a metallic ink) and used a hemp cord to wrap and knot.  These will be all-purpose cards for work that I can add a stamped greeting to inside as needed or leave blank for a handwritten note.  I love the way they turned out.

Sorry if seeing my card posts gets old for readers, but they help me to remember card ideas I've used and who I may have sent them to.

Saturday, May 9, 2020

Saturday snail mail...

These were Nurses' Day cards for our clients who are nurses.

A 'Thinking of You' card for my cousin.  It doesn't look like much in the photo, but better irl; very simple with just the embossed tree and small tag.

And then it got a little out of control.  When I'm not satisfied, I start adding 'just one more thing.'

Yowza...this one had a LOT of just one more things.  :)

This one is a nod to a favorite artist.  It's not nearly as beautiful as Polly Jones' art, but her work does use mixed media, it often has jars, sometimes has a fish or two, and almost always has flowers.  I highly recommend Polly Jones' Etsy shop

And, because I let time get away from me this year, a very simple Mother's Day card for my m-i-l.  

Hope everyone reading this has a Happy Mother's Day...or if you aren't in the US, an all around happy...and healthy...day!

Thursday, April 30, 2020

This pandemic thing, April's end...

The tools of my trade.
And a cowbell...because sometimes you just need more cowbell.

At work I think of things I want to say here.  I get home and I'm too tired or distracted to put them down.  

I'm thirsty.  I need to make masks.  I want a hot bath.

I can't think of words lately...I pause in my speech thinking that they will come, but the pauses string out interminably...embarrassingly.

The other day I had to call our home office for some instruction on an issue I was having.  As I was explaining the situation, my voice sounded funny to me, and I blurted out to the home office associate I was speaking to, "Do I sound hoarse to you...do I sound like a hypochondriac?"  He said, "You sound fine to me.  I think we're all imagining symptoms."  LOL

I have birthday and Mother's Day cards to make this weekend, so maybe there will be a Saturday snail mail post.  I also need to make a week's worth of masks for each of us; but if I could get a few made this weekend I would be happy with myself.  And I need to trim Rudy's nails.  Those are my only plans for the weekend, and I will be ecstatic (and surprised) if I complete them all.

Saturday, December 29, 2018

2018 Cross-stitch...

One of my goals for this year was to be more productive.  My mother's definition of productivity was having something to show for your time.  Since my paying job claimed three times the number of hours this year as in previous years, small projects are what kept me on goal.  

When I saw these perforated-paper tags, I knew they would be a fun way to spend productive time this year.  I searched Pinterest for small cross-stitch patterns that would fit on the tags.  A couple of the designs I graphed myself.  I made most of the tags into cards.  A few are still waiting to be made into cards.

I think most of the following photos have appeared in other posts, but I thought I would assemble them all into a single post by way of a recap for the year's productivity goal.


These were really fun and relaxing.  I'm sure I will be making more in the future.

Monday, December 3, 2018

Library Quilt Group Christmas brunch...

This year we did a Secret Santa gift exchange in our library quilt group.  We were to make six gifts throughout the year, all to go to a single person, but we didn't know who.  At the December brunch today we drew names to see who was the recipient of our gifts.

I had an appointment at the dermatologist (it was either take the opening from a cancellation today or wait till after the first of the year), so I wrapped all my packages in matching paper/ribbon (they look very Grinch-like to me...LOL) so they were easily identifiable in case I didn't make it back before the opening.  I lucked into having a perfect-sized box that just arrived from Amazon to transport them in, so I wrapped it to match too.

Below are the gifts I made in order from my least to most favorite.

Spring shopping bag - meh
I wish I had added a yellow button to each center of the yo-yo flowers and leaves to the stems, but I ran out of time.

Kitchen towels with prairie points
I'm not crazy about the black fabric on the white towels, but I like the vintage kitchen cookery print.

Set of 4 quilt-themed handmade Christmas cards
These were the last things I made, and my time was down to the wire.  I wasn't feeling great, so I kept them really simple.

Coffee mug with sewing tools image

Valentine pillow

Bowl made from fabric-wrapped cord
I love this, and will make myself one very soon.  They can be made pretty much any size and shape.  It was so satisfying watching it take shape relatively quickly.  

I had this much of the post written last night, and had planned to take photos and show what I received as well.  But the dermatologist this morning took a small spot off of the bridge of my nose.  The bandage they applied, that has to be left on for 24 hours, makes my glasses sit askew, so it is making everything a little difficult.  I will try to take photos of the lovely gifts I received at another time.

Related Posts with Thumbnails