background

Friday, October 30, 2015

More Monster Cookies...

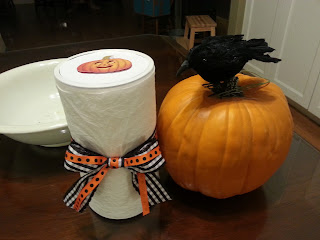
That may look like a roll of paper towels tied in ribbon, but in actuality it is an oatmeal box.  If you remember my Monster Cookie recipe called for a 42 ounce box of oatmeal.

That happens to be the perfect size to contain a dozen or so of the cookies!  I prettied up the box, and stacked some (thoroughly cooled) cookies inside with a disc of waxed paper between each cookie...perfect circumference to keep them stacked neatly!  

It would be really cute, and fairly easy, to decorate it as a Frankenstein head, but I kept it really simple.

All ready for gifting.
Photobucket

Monday, October 26, 2015

Making it Monday...

Today is Diego's 15th birthday.  Aaaack!  15!

I usually have a lot of trouble trying to design cards for the boys, but this one popped into my head this afternoon exactly as you see it above.  All I had to do was go through my photo files till I found this photo taken back when we lived on the the ranch, carve the 'you rock' into it via PhotoShop, use MSOfficePublisher to lay out the card front and 'happy birthday' inside for printing, print it out on watercolor paper, hunt for some raffia ($%*#) jute (double $%*#) burlap ribbon to unravel and use to accessorize, paper cutter, scissors, hot glue gun, foam mounting tape, and put it together.  Easy!

Sheesh!  Glad the hard design work was done for me.

I love being creative, and say thank you prayers often for the inspiration that just floats down and hovers around me.  :)  And the lifetime supply of craft supplies stashed in the craft room.  
Photobucket

Sunday, October 25, 2015

Sunday Desserts - Monster Cookies...

I cut this recipe out of the newspaper probably 25 years ago.  My kids were little, and it was a fun thing to make for Halloween parties.  It makes a big batch.

A *BIG* batch.  I had to buy that bowl just to have something large enough to mix the whole recipe up in.  I put the gallon of milk next to it so you could have a reference as to size.  :)

And you bake them into big cookies.  BIG cookies.  MONSTER cookies.  :)  

I'm sure they would taste the same if you made them smaller, but I'm not sure they could be called MONSTER cookies.  

I posted the recipe several years ago over at What's Cookin' 4 Miles North of Nowhere.  And I didn't forget anything...there really is no flour in this recipe.

I only needed enough today for dessert with the family and some for the kiddos lunches, so I only baked about 2 dozen today.  Luckily the dough freezes well.  I formed logs of dough onto large sheets of waxed paper, then rolled them up, and placed them on cookie sheets to place in the freezer.  There were more logs than would fit on one cookie sheet.

,
After they had been in the freezer for a couple of hours and were chilled firmly enough to handle without bending, I used a Sharpie to write the baking instructions on Zip-lock bags.  Then I placed one or two rolls in each bag.  I plan to give some to Kasey to keep in her freezer for quick treats for the kiddos, and some to a friend of hers who I've been wanting to do something nice for...actually I want to adopt her, but so far she hasn't given the okay.  :)  Jared already took some home for his freezer, and I'll keep some in our freezer, too, to bake later.

They are fun to package (after they are completely cool).  They look really cute wrapped in cellophane and tied with ribbons.

Today I made them a little ghost-y, with tissue paper and googly eyes.  
Photobucket

Wednesday, October 21, 2015

Entertaining friends...

A friend is scheduled to have a 'procedure' on Friday.  That means that tomorrow she will be fasting.  She is NOT looking forward to it...honestly, who does?

Anyway, she was trying to figure out what 'clear liquids' she could live with.  I offered to make her a good chicken broth...actually chicken and vegetable broth.  I stewed a chicken with onion, carrot, celery, and sweet potato, and then strained it.  I put the meat in the fridge to use later in the week, and filled up a quart jar with beautiful and fragrant broth.

Since I was making the broth for her, I invited her and husband to come for dinner tonight so they could pick it up and save me a trip.  :)  Then I planned a dinner that would hold her over through a day and a half of fasting.

The rest of the broth (after her quart was safely jarred) went into making Jalapeno Sweet Potato Soup (see photo above), which I introduced her to when I took her for lunch to Homestead Heritage in Elm Mott, Texas a few years ago.  I know she likes it, because she took her family back and got them hooked on it too.

I also made Italian Baked Chicken, which I knew she wouldn't eat, since she's mainly a vegetarian, but the rest of us did.  It's an easy entree which I usually serve with wild rice, but today I made Oven Roasted Veggie Rice.  I love roasted vegetables, and serving with a spiced rice could have been a main course in itself.  It was very good.


Then, to make sure she was stuffed full of yumminess before she has to start her fasting, I made what I call Makes Me Go Weak in the Knees Brownies and served it with vanilla ice cream.  I made these once years ago when we worked together, and she is still talking about them, so I knew she would be happy to see them rounding out tonight's menu.

I linked the recipes over at What's Cookin' Four Miles North of Nowhere.  

I'm also linking to What's for Dinner Wednesday with Cath@Home.  You can see her button in the right margin.  :)  Cath just moved to a farm in Tasmania, and it's Springtime there.  Lately her photographs are giving me serious envy of her fruit orchard!  
Photobucket

Tuesday, October 20, 2015

Going, going, gone...

 I hadn't attended an auction in quite some time, so I talked my friend, Pam, into going with me tonight.  There were some really nice pieces, but none that called out to come home with me.  

This fire surround was really lovely.  The photo doesn't do it justice.  It went for less than $300...I guess no one had a fireplace large enough to fit it.


I continue to be enamored of enamel ware.  I might have bid on this, but it didn't come up before I left.

This scale is one thing that I was hoping to bid on for the kitchen.  However, it went very early and for somewhere in the neighborhood of $270!  Definitely not within my budget at the moment...cough...cough.

We did get in some interesting people watching.  The average of skin surface area covered by tattoos was very high, as was the average age of attendees.  Pam said that she had never seen that many old people covered with LARGE tattoos in one place in her life.  LOL

So we spent an evening of free entertainment.  I came home empty handed.  Hubby was happy.  
Photobucket

Monday, October 19, 2015

Cooking spaghetti squash...

When Carey's mother was here, I prepared spaghetti squash.  She had never had it before, and she really liked it, but she couldn't quite get a handle on what it was.  Even though she had seen it on the counter, and after I explained the process a few times, I think she still thought it was either pasta that had been made from a dough that included squash, or pasta that I had added a squash sauce to.

I really love it, and they keep very well at room temperature for quite a long time.

To prepare, I start by cutting the stem end off...just enough to get rid of the stem AND give you a flat surface to turn it onto.


Once it sits flat securely, use a large chef's knife to cut it as nearly into halves as you can.


This is what it looks like inside.


I just use a soup spoon to scrape out the seeds and inedible center fibers.  As you scrape, you will feel the firmer flesh underneath...try not to scrape into the flesh, but right down to it.


It should look like this.


Cover a baking sheet (one with raised edges) with foil for easy clean up.  Set the squash on the foil and drizzle one or two teaspoons of olive oil into each half.  Use your hand and rub the oil to cover all surfaces of the inside flesh.


Sprinkle the insides with salt and pepper, and then turn each half flat-side down on the baking sheet.


Place in a 350 degree F oven for about an hour, or until it is tender when pierced by a fork.


Remove it from the oven, and let cool for a few minutes.  I then hold it with a hot pad in one hand, and with a fork in the other hand I scrape the flesh away from the tough skin.  The flesh shreds into spaghetti-like strands.


Empty the squash into a bowl, and continue with remaining squash halves.


To the bowl I usually add about two tablespoons of butter and salt and pepper to taste.  Tonight I also added about 1/3 cup of shredded parmesan cheese, and stirred well till evenly mixed in.


I served it with Chicken Piccata...with a little of the sauce spooned over the squash...and broccoli.  Yum.

Photobucket

Friday, October 16, 2015

Five things Friday...

Five things I did and didn't do this Friday.


1.  I did...help Carey put up a giant spider web for Halloween at Kasey's house.
     I didn't...remember to take my camera, so this photo is from a few years ago, but you get the gist.

2.  I did...read.
     I didn't...finish my last book.  Blech.  Gave up on it.

3.  I did...pay bills.
     I didn't...enjoy it.

4.  I did...buy something for Christmas online.
     I didn't...want to spend the money, so I went back in and cancelled the order before it went through.

5.  I did...cook dinner.
     I didn't...do the dishes...but Carey did.  :)
Photobucket

Thursday, October 15, 2015

Brace yourself...

Kasey couldn't get away from work, so I got to take Diego to the orthodontist to have his braces removed this morning.  He's worn them for two years...he's hiding his excitement behind that yawn.  :)


What a great smile!  And he's not even flashing his dimples yet.

His retainer will be ready this afternoon, so I'll pick him up after school and take him back to pick it up.  I love helping out with scheduling conflicts...it lets me share in their special experiences.
Photobucket

Wednesday, October 14, 2015

What I'm reading Wednesday...

The Memory Thief by Emily Colin

Started but haven't gotten far in this one.  Haven't really wanted to read much this week.  Tomorrow I have to take a kiddo to the orthodontist, so I will probably be glad to have something to take with me.
Photobucket

Monday, October 12, 2015

Making it Monday...


Girls sleepover tonight while I help my friend take care of an administrative chore.  It is now almost midnight.  

I almost never let myself succumb to a late-night sweet craving, but, I mean, it's a girls' sleepover!

So at 11:30 I go to the kitchen, and popped back out in about twenty minutes with hot-from-the-oven chocolate and peanut butter chip cookies.  Yum!

Ready for the recipe?

Cookie Quickie
1 box cake mix (any flavor, I used chocolate)
1/2 cup vegetable oil
2 eggs
optional additions: chocolate or peanut butter chips, nuts, or candy

Stir all together.  Add nuts, or chips (I used peanut butter chips), or candy pieces, or leave them plain.  Experiment with the combinations!

Drop by spoonfuls on an ungreased cookie sheet, and bake at 350 for about 12 minutes.


That's it!  Perfect for whenever you need a super-quick answer to a yearning for a homemade goody. You can see my friend popping one in her mouth in the background.  :)
Photobucket

Friday, October 9, 2015

Sewing a reversible adult scarf/bib...


Well, my house is empty again.  Company has left.  The hubs has returned to work.  I am enjoying the solitude, and I thought I'd share a sewing project I worked on a couple of days ago for my guest.

Lots of women I know are forever spilling something on the front of a clean blouse front at mealtimes...myself included.  My visitor had a bib that she wore at some mealtimes.  It was not something that you would want to wear while dining out, however.  I went on the search for some ideas that would give protection while looking less conspicuous.

The option I liked best was a commercially available scarf/bib that described their product as 54" long by 8 1/2" wide.  I could work with that.

I thought that making these reversible would add to their versatility, so for each scarf I purchased a yard and a half of two coordinating, washable fabrics.  (I could have purchased less fabric and seamed together to make up the length, but I didn't want the added bulk at the seam.)  I chose prints (as spills are less conspicuous on a print than a solid), and I tried to keep my choices somewhat neutral, so they could be worn with multiple outfits.

I cut two coordinating fabric pieces 54" x 10 1/4".  With right sides together, and using 5/8" seam allowance, I sewed around all four edges of the fabric, leaving an opening on one long edge large enough to turn the scarf.

After trimming the corners, I turned the scarf right side out, pressed the seams neatly, and then top-stitched a scant 1/4" around all four edges.  The top-stitching takes care of closing the opening left for turning.


This can be worn loosely gathered as a scarf, and pulled flat to give full coverage of a blouse front.

I added four tucks at the back of the neck so it would lie more comfortably.

Two scarves.

Four looks.

I made this for a petite person, so the length was okay at 54".  If I made any for myself, I would want a longer version, so I would probably make it at least 72" long to look more scarf-like.


I made up an instruction sheet.  Click the photo above to see it enlarged.  You should be able to copy and save it if you find you or someone you know could use one too.
Photobucket
Related Posts with Thumbnails